1. Trim to the exact frame
The timeline reads your clip's real frame rate and shows time as seconds plus frames, so the readout says 1s 9f, not a vague decimal. Drag the in and out handles to rough it in, then tap the arrow keys to nudge a single frame at a time. A loop that opens and closes on the right frame reads as intentional; half a beat off reads as a glitch. The full method lives in the frame-perfect trimming guide.
If you cut video for a living, the standard transport keys work too. J, K, and L shuttle the selected clip: L plays forward, J plays backward, K stops, and a second press of J or L doubles the speed, up to 8x. The left and right arrows step the playhead one frame (hold Shift for ten), and I and O drop the in and out points at the playhead, snapped to the nearest source frame, undoable like everything else. Park the playhead on the exact frame, tap I, find the exit frame, tap O, done. And when one clip should become two, park on the cut and press S (or the ✂ Split button): the clip splits at the playhead into two independent clips, each with its own trim, speed, and effects, so you can drop the boring middle or treat the halves differently.
2. Put text on it (memes included)
Up to three captions per GIF. The Meme style is the classic look: white Impact-style letters with a black outline, auto-uppercased, auto-wrapped. The Clean style uses a brand font with a color picker for labels and lower-thirds. Park a caption at the top or bottom, or choose Drag and place it anywhere on the preview. Each caption can also be timed, visible from one second mark to another, so the punchline lands exactly when you want it. There's a whole video meme generator page on the art of it.
3. Sequence up to ten clips
Add more clips and the sequence timeline appears: every clip as a block sized to its trimmed length, every caption as a bar on its own lane, and a playhead you can scrub straight through the cuts. Up to ten clips share one output, and each block wears its own color, assigned to the clip itself, so when you move a clip its color moves with it. Text bars snap to clip boundaries and to each other, so butting two captions together is the default outcome, not luck. A yellow tick means butted clean; a red band means two captions share the screen (fine when it's top text plus bottom text, worth a look when it isn't). The combine videos guide covers the editorial side.
To change the running order, grab the ⋮⋮ grip on any block and drag it where it belongs; a drop marker shows the landing spot, and the arrow keys work on a focused grip too. The chip strip's arrows still do the same job from above the preview.
4. Choose the frame clip
One clip sets the GIF's size and shape, clip 1 by default. Click the ⛶ toggle on any other clip's chip to hand it the frame instead; the FRAME badge moves, the output dimensions follow, and every other clip adapts. Lead with a wide clip for a 16:9 GIF, or give the frame to a vertical phone clip and let the rest fall in line.
5. Decide how mismatched clips fit
When clips have different shapes, the Mismatched Clips setting decides what happens. Crop to fill (the default) scales each clip to fill the frame and trims the overflow, and the preview dims exactly what will be trimmed so there are no surprises. Fit with bars keeps every pixel and pads the difference with black bars, pillarboxed or letterboxed depending on which way the shapes disagree, shown live in the viewer.
6. Reverse a clip
The ⇄ Reverse toggle plays the active clip backwards in the export. It's per clip, so one clip can run in reverse while the others play forward (the spilled coffee un-spills, then the next clip carries on normally). To see it before exporting, hit ▶ Play edit on the sequence panel: it rehearses the whole edit through the encoder's own pipeline, and reversed clips actually run backwards.
7. Speed it up, slow it down, bounce it back
Every clip carries its own Speed, 0.25x to 4x. Drop a fast gesture into slow motion or compress a lazy pan into a beat; the clip's block on the sequence timeline stretches or shrinks to match, so the edit's real running time never lies to you. Bounce is the boomerang: the clip plays forward to its out point, then straight back to the start, one loop, no seam. The toggles compose, bounce a 0.5x clip for the classic slow rebound, or bounce a reversed clip to lead with the backward pass. All of it is per clip, so one boomeranging moment can sit in the middle of an otherwise ordinary sequence. The boomerang page makes a sport of it.
8. Dress the footage (or cover part of it)
Rotate turns a clip 90, 180, or 270 degrees and mirror flips it along either axis, both per clip, so one sideways phone video rights itself without disturbing its neighbors. The rest of the wardrobe covers the whole edit. Filters come as presets, black and white, sepia, warm, cool, invert, and they render underneath the captions, so text stays crisp on tinted footage. The shape tool drops solid rectangles, circles, and triangles in colors you pick: drag a box on the preview and it fills it. Add as many as you like, then drag any one to move it and grab its top handle to rotate it. Use them to hide a name or a face behind a solid block, or as plain design elements, and every one is adjustable and undoable like everything else. And the watermark takes an image of your own, parks it in a corner or dead center, and hands you size and opacity dials. Branding on your terms; the tool itself still adds none.
9. Undo anything (even a deleted clip)
Every edit is undoable: trims, crops, reorders, reverse toggles, caption changes, fit and frame choices, and clip removal. The ↶ Undo and ↷ Redo buttons live in the top bar, and Ctrl+Z / Ctrl+Shift+Z (Cmd on a Mac) do the same from the keyboard. Deleted the wrong clip? Undo brings it back whole, trim, crop, color, and all. A drag counts as one step, so undoing a slider gesture doesn't replay it in slow motion.
10. Fade in, fade out
Under All settings, the Fade In / Out row eases the whole edit up from a color at the start and back down at the end. Pick a duration for each end (off to two seconds) and a color, black by default, or match a slide background with the swatch. The fade applies to the entire assembly, not per clip, and it shows up everywhere the edit does: the Play-edit preview, the GIF, and the MP4. On a looping GIF the fade doubles as a graceful loop seam: down to black, back up, and the restart looks designed instead of abrupt.
11. Save the project, come back later
Save project in the top bar downloads a small .wtg file describing the entire edit: clip order, trims, crops, reverse flags, captions, fades, every dial. It's a recipe, not footage, so it weighs a few kilobytes and nothing in it ever left your browser. To pick the edit back up, drop the .wtg onto the tool together with the same clip files and the project reassembles; drop it alone and the tool lists exactly which files it needs. Clips match by filename, so keep the originals wherever you keep footage.
12. Photos are clips too (paste them, even)
Drop a still photo, JPG, PNG, WebP, or AVIF (HEIC in Safari), and it lands as a five-second freeze-frame clip: trim it shorter, caption it, sequence it with video and GIFs. Ten photos make a slideshow; one photo between two clips makes a title card. Faster still, paste: copy a screenshot and press Ctrl+V (Cmd on a Mac) anywhere on the page. Phone photos carry a bonus. An Android motion photo (Pixel, Samsung) hides a real MP4 inside its JPEG, and the tool finds it the moment the file drops and offers the moving version. Drop an iPhone Live Photo pair, the photo and its video sharing one name, and the tool skips the duplicate and takes just the video; the Live Photo guide covers getting that pair off the phone.
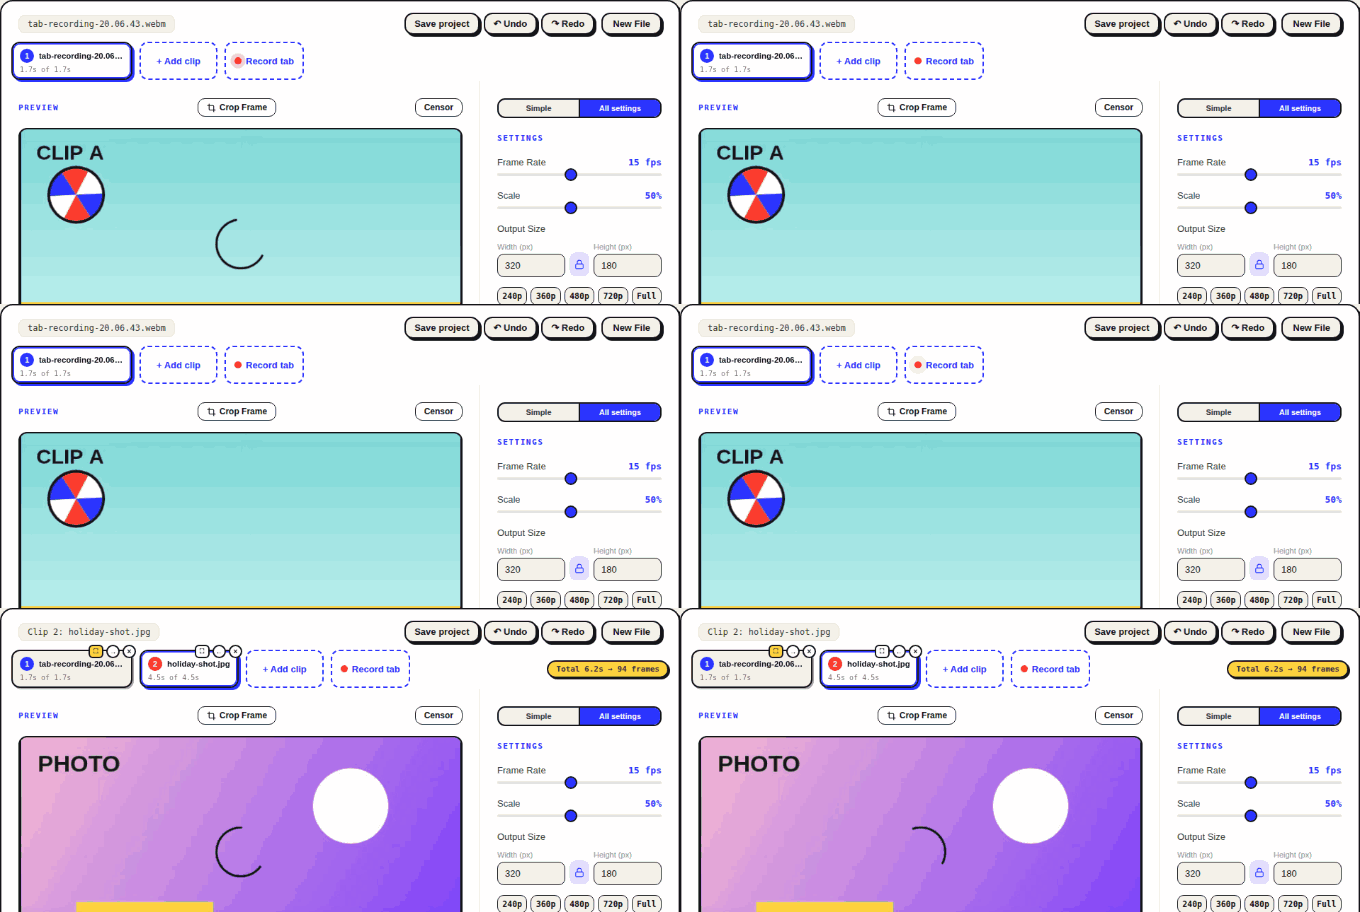
13. Start from a GIF, leave with GIF, APNG, or MP4
Two doors, both ways. In: an existing GIF loads like any video. Drop one and it's unpacked into frames right in the tab, then behaves like any clip: trim, crop, caption, sequence. (Transparency flattens onto white, and a very long GIF imports its first couple of minutes.) Out: the Output Format switch offers three. GIF plays anywhere an image does. APNG is full color with no palette limit, usually a bit bigger than GIF but cleaner on gradients, and every current browser plays it. MP4 is a silent H.264 video, far smaller, encoded by the browser's own encoder where one exists (Chrome, Edge, Safari; Firefox varies); it swaps the palette dials for a bitrate picker. Put any of it together (gif-to-mp4, video-to-apng) and it happens entirely on your machine.
14. Shrink it (the always-on optimizer)
Every GIF leaves here optimized, no dial required: identical frames merge into one longer delay, and each changed frame stores only the rectangle that actually moved, with the rest left transparent. That pass is lossless and always on. The Extra Compression dial (Light, Medium, Strong) goes further with lossy encoding, typically 30 to 50 percent smaller in trade for mild grain, and the size estimate, measured from real frames, drops as you turn it, so you see the savings before you commit. Loop plays forever, once, or 2, 3, or 5 times. Frames (.zip) hands over every rendered frame as numbered PNGs. Chasing a hard ceiling? The GIF compressor squeezes hardest.
The dials underneath everything
The settings panel opens in Simple mode: width, format, and quality, which is all most GIFs need. The All settings toggle reveals the rest, frame rate, clip in / out, palette, loop, fades, and the MP4 bitrate, and the panel remembers which mode you prefer. Either way the convert button stays put, right under the source info.
Whatever you build, four controls decide a GIF's file: frame rate (10 to 15 fps suits most GIFs), scale (downsizing width is the biggest single saving), colors (64 to 128 is plenty for most footage), and dithering (smooths gradients at a small size cost). The size estimate isn't a formula guess: it encodes a few real frames of your actual clip through the real pipeline and extrapolates, so it lands within a few percent, and after an export it reads the exact measured size. Tune to the number instead of exporting and hoping. Chasing a hard ceiling? The small-file recipe and the GIF compressor squeeze hardest; chasing crispness, read high-quality video to GIF.
And the part that never changes: all of it runs in your browser tab. No upload, no account, no watermark. Close the wifi after the page loads and every feature on this page still works.